In this article we will look at a variety of navigational techniques to cross an area of water with tidal current. We will look at when you might use each technique and what its limitations are.
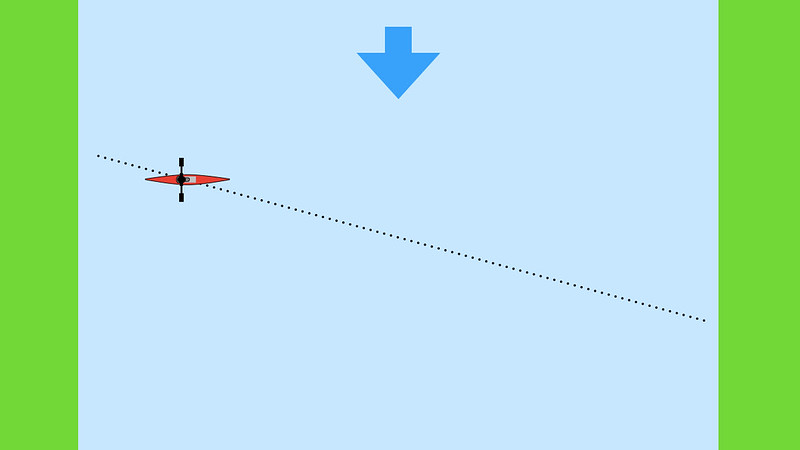
Image by Sea Kayaking Anglesey
In the first example if the kayaker points straight across the flow they will cross the area of current the quickest, but they will be taken downstream of where their boat was originally pointing. This technique is appropriate when you want to cross the flowing water quickly, for example if it is a busy shipping lane.
If you don't want to be taken down stream you need to point your boat upstream the correct angle depending on your speed and the speed and angle of the flow. One technique you can use to get the angle right is a transit (or a range as they are called in America). This requires you to have a couple of visible stationary objects in line with each other that are on the track you wish to take. By keeping these in line with each other you know you are on track.
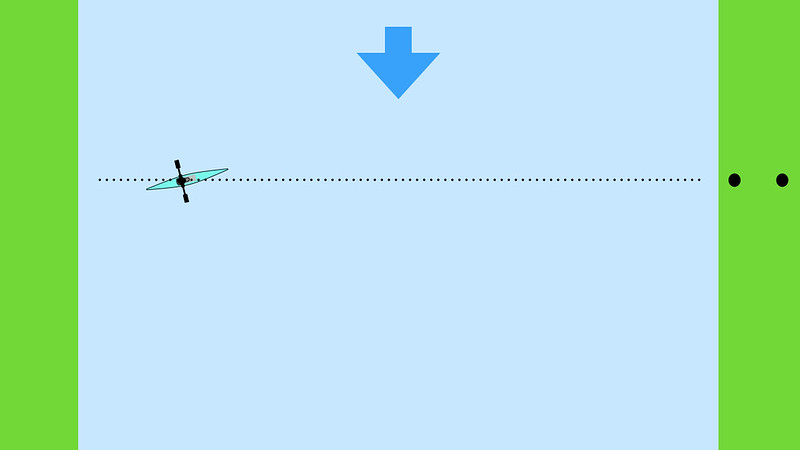
Image by Sea Kayaking Anglesey
The two objects can be behind you, although this makes them harder to use. You can also use two objects on either side of the crossing and use your paddle to see if they are in line. By pointing one end of your paddle at one object, keeping your eyes directly above the centre of the paddle shaft and seeing if the other end lines up with the second object, you can tell if you are on track.
A limitation with transits is you need good visibility. Another is that although they are very accurate about the flow you are currently in they do not predict the future flow. For a longer crossing in which the tidal flow will change over time, you want to know the tidal flow predictions before you set off and calculate you ferry crossing angle. The calculation method used is called a vector.
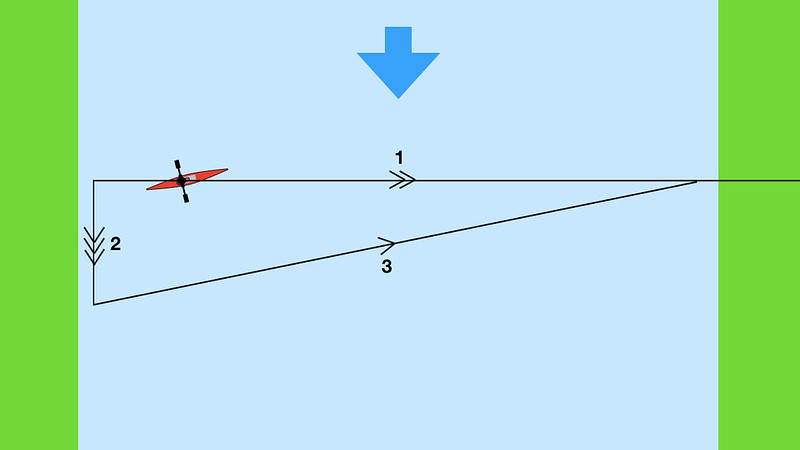
Image by Sea Kayaking Anglesey
In the example above we have a crossing of that would take about an hour to do. To calculate the bearing you need to paddle at we first draw a straight line from where you want to start from, through where you want to go, and beyond. You then use the tidal flow predictions to plot the direction and distance the tide will drift you off your course over an hour. Finally, starting from the end of the drift line, you measure out the distance you estimate you will paddle in an hour and see at what point that reaches the first line. This third line is the angle you need to paddle your boat at to get to the desired destination. (The arrows on the lines are nautical navigational nomenclature and don't make a lot of sense in this context but they are the standard way of labelling the different lines.)
One limitation of a vector is that the tidal data that you have available is often just from one specific location that may not be representative of the whole crossing. Another is that unlike a transit a vector doesn't take into account things like the wind or variations in your speed. Another issue arrises if your crossing is much more than an hour.
In this situation you can simply calculate another vector starting from the end of your first one, and you can keep repeating this process for as long as it takes to do the crossing. However as the tidal flow changes over time, the ferry angles that this method calculates become more and more inefficient.
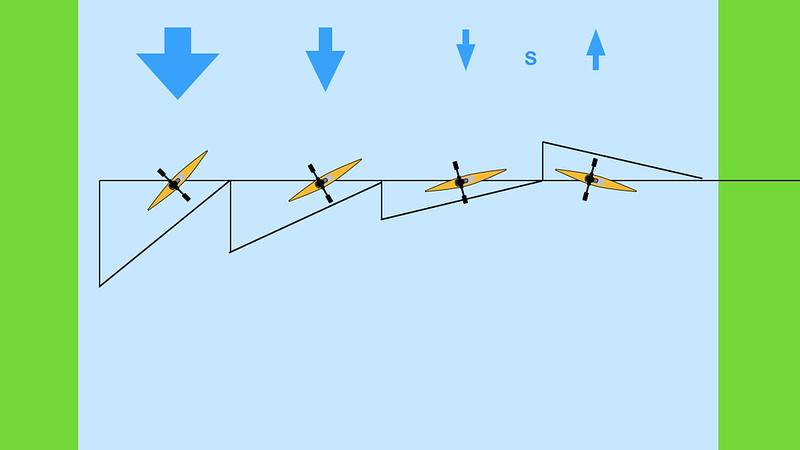
Image by Sea Kayaking Anglesey
In the example above we have a 4 hour crossing where the flow changes from fast to medium and then slow before changing direction after slack water. The multiple vector method becomes particularly inefficient over the last two hours where instead of ferry gliding in one direction and then the opposite direction you could simply paddle straight across and the two flows would take you one way and then bring you back, canceling each other out.
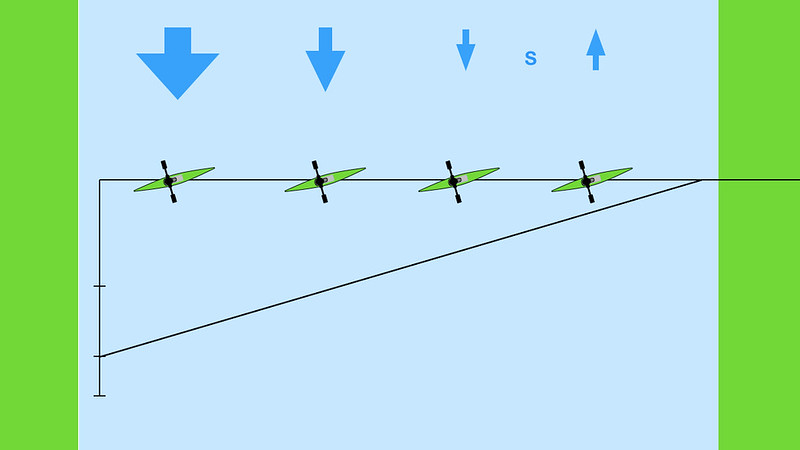
Image by Sea Kayaking Anglesey
A more efficient ferry angle can be calculated by adding all 4 drift directions and distances end to end and then using the estimated distance you will paddle over the 4 hours to see where it will get you to on your track.
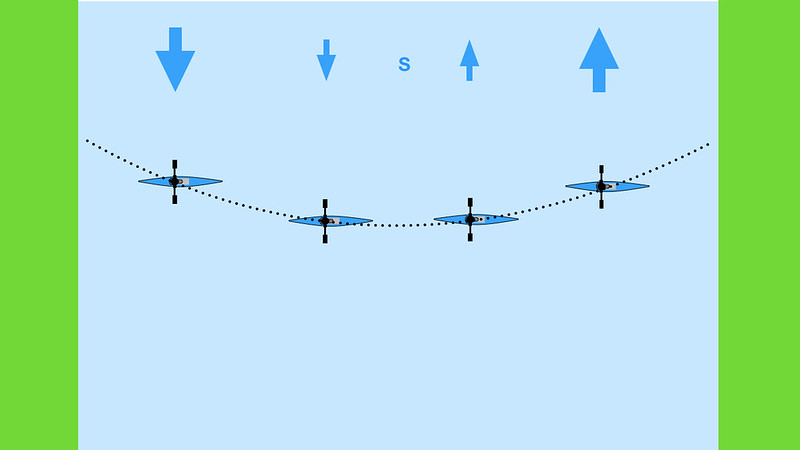
Image by Sea Kayaking Anglesey
The most efficient way to cross though is to wait until you estimate you will have slack water exactly half way across. That way all you need to do is keep your boat pointing on the compass bearing that your destination was originaly on and you will be taken one way by the tide until half way and then you will be taken the other way until you end up at your destination. This way you will only paddle the distance of the crossing, where as all the other methods involve paddling somewhat against the tide. The obvious limitation with this method is that you need to have the flexibility to wait for the correct starting time, but the longer the crossing, or the faster the current, the more worthwhile it is to wait.

By Philip Clegg
With over two decades of working in the sea kayaking industry, Phil can be found on a daily basis coaching for Sea Kayaking Anglesey. That's when he's not expeditioning, playing or putting kit to the test.